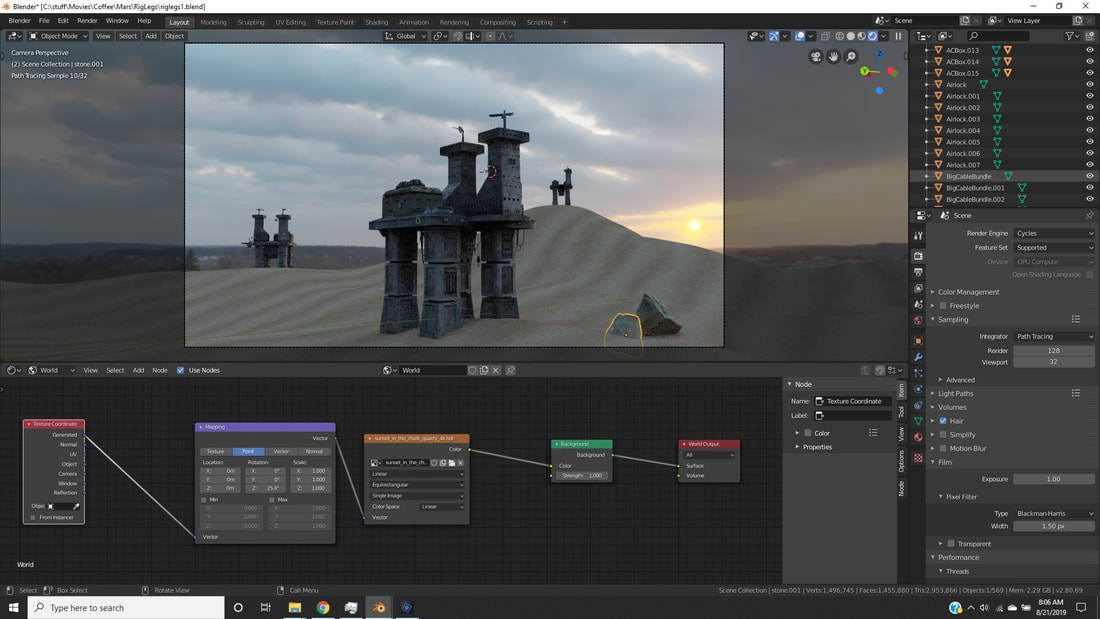
I had been meaning to figure out how to do this for ages. Another one of those things that wasn't immediately trivial but actually isn't difficult and can save a lot of time. Click the world tab on the left side of the shader editor and then add the mapping node. Stolen from here: https://blender.stackexchange.com/questions/47833/how-do-i-rotate-an-environment-texture
0 Comments
Scale is an interesting issue in games and movies. Right now I'm working on a racing car video. Knowing how much track I need for a given shot is quite important since making the track and road side buildings is pretty time consuming. Not to mention rendering. At 24 fps, a 3 second clip could take half a day to render. Generally in a package like Blender I'll assume one unit = 1 meter in my imaginary world. Then I can do calculations like how many meters can I cover at 100mph? The math to figure that out isn't hard, but the magic of the internet makes its trivial with conversion tools. So if I want a 3 second shot of a car driving at 70, I need about 100 meters of track. Of course if the track isn't straight then the cars have to slow down, so a tight turn will reduce the amount of content that needs creating, as well as potentially reducing the render time (size of visible set). The first Ridge Racer was very cleverly designed to keep performance up. The track was designed to never require more performance than the PlayStation could provide :-) Neeeeoooooowwwwwwmmmmm!!!!!I'm trying to render something like this, but with Aliens. And I'm definitely going to steal the engine sounds from this video, and I'm not going to feel guilty because Shell has enough money already. :-0 I've been about it for a couple of years but I finally sat down and started to learn Substance Painter for texturing. Substance Painter combines procedural texturing with layer based painting and masking. This unlocks a world of possibilities without the pain of having to paint directly into UV Maps in photoshop. Color me excited.
I recently finished another little film project. This is another in my series of "Ancient Aliens/Ghost Hunter" knock offs. It was mainly an excuse to attempt another 3d animated character. This time the character was fully skinned and animated while being lit using HDRi lighting and physically plausible shading. A high res HDRI meant I could also use it for rendering. Additional buildings were brought in from Sketchfab at reasonable cost. As the rendering was going to degraded to look like camcorder footage I could take certain liberties with the model. The wolf was modeled, textured, animated and rendered in Blender. I'm slowly getting the hang of 3d sculpting, but I really need to learn how to retopo my models for better texture mapping. That also means I'll be able to start to use Substance painter, something I'm really excited to try. I also didn't add any fur to this model. I'm not clear how you mix furry and not furry body parts and how you deal with the seams. More stuff to learn I guess :-) Check out the whole video below. A fairly common requirement for low poly modelling is the ability to mix flat and gouraud shaded triangles in the same mesh. Typically you want shared normals with interpolation to make objects appear smoother than they actually are, but at some threshold you need the faces to stop sharing normals to preserve hard edges. Turns out this is easy to enable in Blender, but it's a 2 step operation.
In the left image, the model is completely smooth shaded with vertex normals being shared by adjacent faces. This looks great for curved surfaces but is completely wrong for sharp edges. The image on the right is using Auto Smooth. We still get shared normals across most surfaces but can set the angle at which new unique normals are generated. A better looking result for minimal real time performance impact.
I wanted to be able to make a light flash forever without having to enter a whole bunch of key frames in the dope sheet. Turns out using the graph editor you can add a variety of procedural effects. Later on I needed to add a bit of secondary motion to a robot helicopter. Turns out you can also use the graph editor to do this. Add start and end keyframes and then apply a function (sin curve) to get a nice little wobble. Super handy and very easy to tune. The Blender community and YouTube are amazing resources :-)
It's been a bit quiet around here since July. Bad David. I've been busy though, I finished 3 short films as part of the process or learning how to model, animate and render high quality images using CG. You can check out IRON DUKES below. It uses HDRI world lighting and PBR shaders which means the lighting is realistic and consistent across a wide range of environments. If you want to see the other 2 films I made (and some of my catalog of cheesy youtube badness) you can head over to my film making website: http://www.cmzpictures.com/
Making a Sea Monster film, partly because I like monster movies, but mainly to learn how to model, shade and rig 3d characters using Blender. More on the movie side of my website: CMZPICTURES.COM
My first pass at rendering underground scenes for my new film in Blender is a bit noisy. I think this caused by the dim lighting. Increasing the number of samples decreases the noise but at the cost of more time for rendering. In the Samplings settings box under Render I tried the Samples setting at 12, 24, 32 and 64 12 = 144 Samples 24 = 576 Samples 48 = 2304 Samples 64 = 4096 Samples Looking at the animated GIF above, it should be possible to see the grain at 144 and that the difference between 2304 an 4096 is hard to discern. I guess I'll be using 48 samples... :-/ Ray tracing is expensive, but the interplay of light with the scene might be worth it. I love how the blue coffin light reflects off the robots back and illuminates the back of the scene as he moves toward the camera. The realistic soft shadows are hard to argue with also. Using Voronoi noise to make a "fridge texture" combined with a two tone hard shiny surface with uv mapped decals using the alpha as a mix. Trying to figure out a way to soften the bump map a touch. It's a bit harsh right now. Node based shaders get out of control quickly... This is for a medical robot. A dangerously insane medical robot. Naturally. It's all in service of a new film. Here's a rough work in progress of some of the effects shots. I'm trying to do as much as possible in the computer rather than using practical effects. |
David CoombesMaking stuff Categories
All
Archives
February 2024
|